This article is about incorporating peanut butter in unexpected way into everyday dishes, to come up with something drool-worthy.
You can make your own peanut butter right in your apartment. Did you know that? All you need are some high-quality roasted, unsalted peanuts—about 2 cups. Throw them into a food processor and blend for 2-3 minutes. At first, you’ll get a crumbly mess, but keep going! The peanuts release their natural oils, turning everything silky smooth.
Now, the fun part: seasoning. Add about ½ teaspoon of flaky sea salt and 1-2 teaspoons of your favorite sweetener—honey, maple syrup, or agave nectar. Blend it again for another 30 seconds to get everything mixed.
Taste it! Adjust the salt or sweetness to hit your perfect balance. Some like it a bit saltier, others crave a touch more sweet. You could even throw in a splash of vanilla or a dash of cinnamon if you want to get fancy with it.
Once it’s all deliciously blended, scoop it into a jar and pop it in the fridge. That’s it! You’ve got yourself homemade peanut butter, creamy, fresh, and ready to spread on literally everything.
But the problem is, all we ever do with PB is eat it straight from the jar or go PB&J with it in a sandwich. Well, you’re about to learn all the delicious ways you can pair your peanut butter, and trust me, it’s about to get wild.
23 Freakishly Perfect Peanut Butter Pairings
Peanut Butter + Spicy Stuff
- PB + Sriracha on Chicken Wings: Get ready to have your wings coated in a sexy peanut butter and sriracha sauce. It’s spicy, creamy, and rich in a way that takes the wings to an almost Thai-inspired place. Toss some lime and cilantro in there if you’re feeling extra.
- PB + Hot Honey Drizzle on Fried Chicken: Take a crispy, juicy piece of fried chicken and drizzle it with a peanut butter-honey mixture that’s got a spicy kick. You get salty, sweet, spicy, crunchy—all the glorious extremes.
- PB + Spicy Ramen Broth: Stir a spoonful of peanut butter into your ramen broth with some chili oil or sriracha. It gives the soup a rich, creamy base with that satisfying kick of heat.
- PB + Jalapeño on Pizza: Smear peanut butter on a slice of pizza (yes, pizza!) and add jalapeño slices. The heat from the jalapeños pairs with the creamy, salty peanut butter for a bizarrely good topping combo.
Peanut Butter + Cheese (oh, yes)
- PB + Cheddar Cheese on a Grilled Cheese: Don’t even give me that skeptical look. The sharpness of cheddar combined with the richness of peanut butter, melted between buttery toasted bread? Think of it as the savory cousin of a PB&J, only with this strange depth of flavor. Add a few slices of apple or bacon to hit that next level.
- PB + Cream Cheese on a Bagel: Smooth peanut butter with tangy cream cheese on a bagel gives a completely unexpected luxurious texture and a punch of savory. Top it with thinly sliced cucumber for that crunch factor.
- PB + Feta on Crackers: The tangy, crumbly nature of feta cheese on a cracker with a swipe of peanut butter creates a perfect balance of sharp and creamy.
- PB + Blue Cheese in a Burger: Spread peanut butter on your burger bun, then top your burger with blue cheese. The strong flavor of blue cheese cuts through the richness of the peanut butter for an intense flavor bomb.
Peanut Butter + Random Veggies (No, Really)
- PB + Roasted Brussels Sprouts: Brussels sprouts get this amazing charred caramelization when roasted, so toss them in a warm, spicy peanut butter glaze with a hint of soy sauce and chili flakes. The nuttiness complements the bitterness of the Brussels in an oddly satisfying way.
- PB + Cucumber Slices as a Snack: Simple but refreshing. Thinly slice some cucumbers and give them a little swipe of peanut butter, then sprinkle with flaky sea salt. It’s the crunch-meets-smooth you didn’t know you needed.
- PB + Roasted Cauliflower: Roast cauliflower florets until golden, then toss them in a warm peanut butter and soy sauce glaze. It adds a nutty twist to the tender, slightly charred cauliflower.
Peanut Butter + Pickles
- PB + Dill Pickles on a Sandwich: People either love or hate this, but if you’re on the adventurous side, try spreading peanut butter on your bread and layering thinly sliced pickles. The salty, vinegary tang of the pickles plays so unexpectedly well with the creamy peanut butter. It’s weird and wonderful.
- PB + Pickled Jalapeños on a Rice Cake: Rice cakes are the ultimate neutral base, and you can turn them into a powerhouse snack. Slather on the peanut butter, sprinkle some pickled jalapeños, and drizzle honey. It’ll hit all the spicy-sweet notes your taste buds crave.
Peanut Butter + Caramelized Bacon
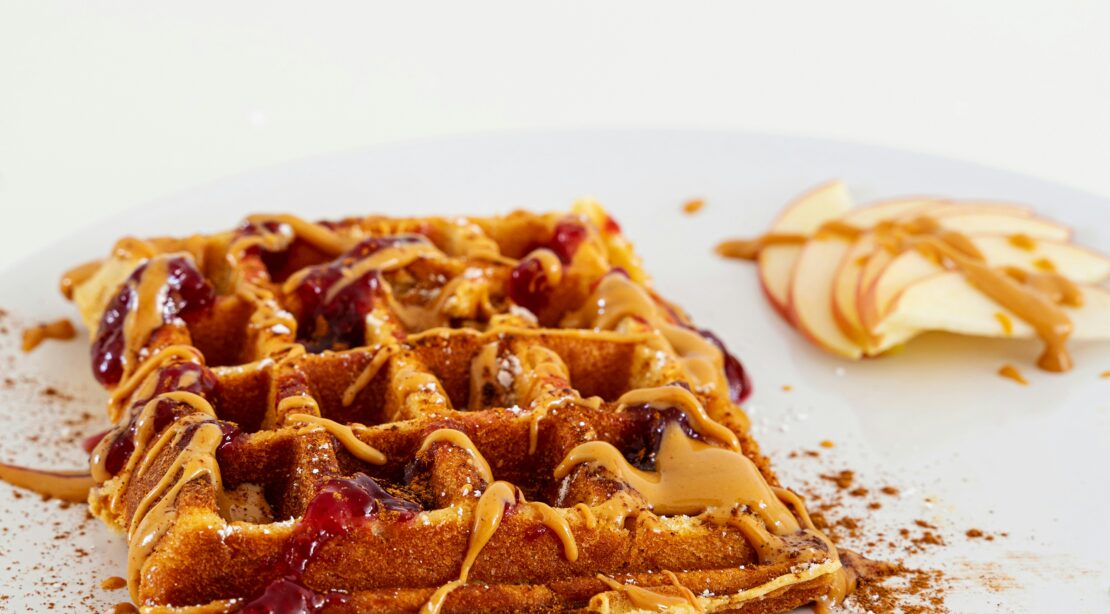
- PB + Bacon on Pancakes or Waffles: Ever have bacon-caramel pancakes? Replace caramel with a drizzle of peanut butter, and you’ve just taken your brunch to the next level. The salty-sweet peanut butter melts into the crispy bacon and pancakes or waffles, creating an unholy union of pure flavor.
- PB + Bacon Grilled Bananas: Grill some bananas (yes, bananas!) with a little butter until they’re soft and caramelized. Then crumble crispy bacon over them and drizzle with melted peanut butter. Serve it warm with vanilla ice cream, and try not to faint.
Peanut Butter + Potatoes (Bet You Didn’t See This Coming)
- PB + Sweet Potatoes: Bake or roast some sweet potatoes until they’re nice and soft, then dollop a little PB on top. It’ll melt into the crevices and create this sweet-nutty-savory vibe that feels like a comfort food hug. Add a sprinkle of cinnamon if you’re feeling wild.
- PB + French Fries: Fries and milkshakes are a thing, so why not fries and peanut butter? Especially with spicy or salted peanut butter. Dip your fries in melted PB and watch as your taste buds thank you for the revelation.
Peanut Butter in Soups & Stews
- PB + Ramen: Next time you’re making a bowl of ramen, stir a tablespoon of PB into the broth. It’ll thicken it up and give it a richness that feels like you’re eating a secret off-menu special at a fancy noodle bar.
- PB + Tomato Soup: A big, creamy swirl of peanut butter in tomato soup adds a touch of indulgence. It gives the soup an unexpected twist that makes it taste way more gourmet than it is.
Peanut Butter + Ice Cream
- PB + Vanilla Ice Cream + Potato Chips: There’s no law that says toppings have to make sense. Warm up some PB and drizzle it over a bowl of vanilla ice cream, then smash some potato chips on top for a salty crunch. It’s heaven for texture lovers.
- PB + Chocolate Ice Cream with Chili Powder: Peanut butter drizzled over chocolate ice cream is already a no-brainer, but adding a sprinkle of chili powder or even cayenne takes it to another level of bold. That heat? Paired with the cold? Sensory overload in the best way.
Peanut Butter + Eggs
- PB + Fried Egg on Toast: This is a great savory breakfast twist. Smear a bit of PB on toasted bread and top it with a fried egg. The runny yolk mixes with the creamy PB to create something borderline ridiculous in flavor.
- PB + Scrambled Eggs: Hear me out—when scrambled eggs are light and fluffy, a dollop of peanut butter melts right in, especially if you’re adding a sprinkle of chives or herbs. It’s different, but surprisingly works.
Do these weird peanut butter pairings really taste good?
It’s all about balance. You’d be shocked how flavors like sharp cheese or spicy sriracha bring out something amazing when mixed with peanut butter.
What about seafood?
Okay, let’s get weird. We’ve already seen PB master the sweet and savory realm, but what about seafood?
Picture it: a peanut butter shrimp dish, maybe even with a hint of chili paste for spice.
The nuttiness could balance out the sweetness of shrimp.
What about bitter greens? Toss some sautéed kale or collard greens in a creamy peanut butter sauce and suddenly those bitter bites turn rich and velvety.
Even something like anchovies could offer a salty, briny contrast to the sweet richness of PB—creating an unexpected umami bomb.
As for funky spices, pairing PB with something like garam masala, turmeric, or sumac could add deep, earthy layers of flavor.
And why not test it with fermented foods? Think miso paste, kimchi, or sauerkraut—items that seem odd at first glance but could introduce a tangy complexity.
PB loves bold, daring flavors. The point is, there’s no end to what PB can handle if you’re willing to experiment beyond the obvious.
Its adaptability is the key to unlocking new culinary territories. If PB can work with pickles, who’s to say it won’t nail anchovies or kale?
PB in fine dining?
You bet.
Amuse-bouche: a dollop of PB mousse on a crostini, topped with microgreens and a drizzle of balsamic reduction.
The richness of the PB, combined with the tangy acidity of balsamic and the crunch of toasted bread, elevates this humble ingredient into something sophisticated.
Or how about a peanut butter beurre blanc sauce over seared scallops?
The rich, creamy butter sauce infused with a hint of nuttiness could complement the sweetness of the scallops without overpowering them.
Then, there’s the idea of PB foam—like something you’d see on a “Top Chef” plate—sitting next to a perfectly cooked piece of steak, bringing both richness and airiness to the dish.
For dessert, you could turn PB into a refined parfait, layering it with dark chocolate ganache, sea salt, and hazelnut brittle for added texture.
PB can definitely hold its own in the world of gourmet food. It’s all about balance, texture, and playing with unexpected contrasts. It’s not just a spread anymore; it’s an ingredient with depth, ready to be taken seriously by anyone brave enough to try.
Texture is everything with peanut butter.
It’s not just about flavor; it’s about how it feels when you bite into it.
Crunchy PB works best with foods that need a little extra texture to balance them out, like roasted veggies or sandwiches with soft ingredients (think bacon, lettuce, and peanut butter—it’s magic).
The crunch adds another layer of interest that creamy peanut butter can’t offer.
On the flip side, smooth PB melts seamlessly into things like soups, sauces, or even ramen broths, creating a luscious, rich texture that coats everything in creamy goodness.
Imagine a crispy chicken wing slathered in a smooth peanut butter glaze—perfect for creating that sticky, rich mouthfeel.
But if you’re adding peanut butter to a dish where texture is already varied, like a salad or stir-fry, chunky peanut butter could give a fun twist, adding a little unexpected crunch amidst the soft veggies.
In desserts, too, texture makes a big difference.
Think about PB paired with something crunchy, like caramelized nuts or brittle—versus when it’s velvety and smooth, like in a pie filling.
Texture can make or break the overall experience, especially with such a bold, creamy ingredient.
The type of PB you use can absolutely change how a dish turns out.
Natural PB, with its straightforward, pure flavor (just peanuts, no added sugar or oils), is the best for savory dishes.
Its earthy, unadulterated taste plays well with strong flavors like soy sauce, sriracha, or sharp cheeses. If you’re making peanut butter wings or ramen, natural PB’s simplicity lets the other ingredients stand out, while still adding that signature nuttiness.
Powdered PB is exceptionally transformative for sauces and smoothies because it cuts down on fat and calories while still delivering that peanutty taste.
If you’re mixing it into a stir-fry or a light dressing, it gives you more control over texture—since it blends easily into liquids without adding thickness.
Flavored peanut butters, like chocolate or honey varieties, are great for sweet pairings, but they can also be used creatively in savory dishes.
Think about honey PB on a charcuterie board, paired with aged cheeses or spicy mustard. Or chocolate peanut butter in a mole sauce over chicken—it adds depth without being overly sweet.
The kind of PB you pick totally shifts things up, but it’s still super flexible. Just gotta find the right one for whatever you’re making.
The limits of sweet and savory pairings with peanut butter
Peanut butter is pretty versatile, but it’s not invincible. There are definitely limits to how far it can be pushed in sweet-and-savory territory.
Take something like caramelized onions—you might think the sweetness could complement PB, but the soft texture and deep, almost molasses-like flavor could clash with PB’s creaminess.
Similarly, acidic ingredients like lemon or vinegar need to be handled carefully.
While a splash of acidity in a savory sauce could balance peanut butter’s richness, too much sharpness might overwhelm the smooth, nutty base.
On the sweet side, pairing PB with overly rich desserts like tiramisu or cheesecake could be overkill. Both dishes are already indulgent, and peanut butter might make them feel too heavy.
The key to nailing the balance is thinking about textures and complementary flavors. PB works best when it’s adding contrast—creamy vs. crunchy, salty vs. sweet.
When it’s too similar to the other ingredients (like in a sweet-on-sweet overload), it starts to lose its charm.
How does temperature impact peanut butter’s role in different dishes?
Temperature can completely change how peanut butter behaves in a dish. Warm peanut butter, for instance, melts into a glossy, rich sauce that’s perfect for things like wings or noodles.
Its smooth, almost liquid texture makes it cling beautifully to hot food, coating everything in that creamy, nutty richness.
Think about a warm peanut butter drizzle over pancakes or waffles—the warmth enhances the sweetness and smooths the texture, making it more luxurious.
On the flip side, chilled PB holds its shape better and has a firmer texture, so it works well in desserts like pies, where you want structure.
Cold peanut butter can also provide contrast in dishes like sandwiches or as a topping for warm brownies or cookies—offering that delightful mix of hot and cold.
Peanut butter at room temperature is probably the most versatile, though.
It’s spreadable enough for sandwiches but won’t melt into a dish too quickly, which makes it perfect for things like toast or as a dip for fruits and veggies.
Each temperature brings out different qualities—cold PB for texture, warm PB for richness—so it’s really about how you want the peanut butter to interact with the other elements in the dish.
PB pairings adapted for different dietary preferences or restrictions
PB’s already a great base for a lot of different diets, but with some tweaking, it can fit into almost any dietary preference.
For vegan eaters, most of these pairings can be easily adapted by using plant-based versions of the other ingredients.
A vegan grilled cheese with peanut butter can be made using dairy-free cheese, and spicy PB wings can be made with cauliflower or tofu instead of chicken.
For those on a keto or low-carb diet, PB is already a great high-fat, low-carb option. To make it fit within this diet, you’d just want to cut out sweeteners like honey or maple syrup, and maybe use stevia.